
MEN: How Do You Do Push-Ups Properly? Form, Reps, and Progression for Men
Quick Answer
Proper push-up form means shoulders packed (not shrugged), elbows at 45 degrees from your body, a straight line from head to heels, and full range of motion from chest to floor. Control the descent (3 seconds), pause briefly (2 seconds), and drive back up (1 second).
The most critical error men make is flaring elbows to 90 degrees, which shifts load away from chest muscles and onto shoulder joints. Start with 5 perfect reps before adding volume. Progress by cleaning up form first, then adding reps, then changing the variation.
Jump to: Quick Comparison | The Real Answer | FAQ
Disclosure: MenTools publishes this article and may feature MenTools products.
How we evaluate: Products are assessed on nutrient form quality, dose vs NRV, authorised health claims, male-specific design, and independent research. Full sources are listed in the references below.
Quick Comparison
| Variation | Hand Position | Target Muscles | Difficulty | Best For | Common Error |
|---|---|---|---|---|---|
| Standard Push-Up | Shoulder-width, 45° angle | Chest, triceps, front shoulders | Intermediate | General strength | Elbows flared to 90° |
| Close-Grip Push-Up | Hands 6 inches apart | Triceps, inner chest | Intermediate-Hard | Triceps emphasis | Hands too close (under chin) |
| Wide-Grip Push-Up | Wider than shoulders | Outer chest, shoulders | Intermediate | Chest width expansion | Elbows locked at top |
| Diamond Push-Up | Hands touching, thumbs and index fingers form diamond | Triceps, chest | Hard | Triceps strength | Hips sagging, hands too narrow |
| Archer Push-Up | One arm extended, one bent | Chest, shoulders, stabilisers | Hard | Progression to one-arm | Core not engaged, rotating torso |
| Incline Push-Up | Hands on elevated surface | Chest (lower emphasis), shoulders (higher) | Beginner-Intermediate | Building from baseline strength | Poor scapular control |
The Real Answer
What does correct push-up form actually look like?
Correct push-up form starts with your foundation. Place your hands slightly wider than shoulder-width, roughly 1 to 2 inches beyond each shoulder. Your feet should be hip-width apart or slightly narrower for stability. Your entire body—from the crown of your head through your heels—should form one straight line. This is not achieved by rigid tension everywhere; it means your core is braced enough that your hips don’t sag and your lower back doesn’t hyperextend [1].
Your shoulders should be “packed” into their sockets. This means your shoulder blades are slightly retracted and depressed, not shrugged up toward your ears. As you descend, your elbows should travel at approximately 45 degrees from your torso, not flared out to 90 degrees. Your chest should lower toward the floor until it’s roughly an inch above the ground, creating full range of motion [2].
Breathing matters. Inhale as you lower yourself (eccentric phase), hold briefly at the bottom, then exhale forcefully as you press back up. This breathing pattern stabilises your core and increases intra-abdominal pressure, which improves force transfer through your body.
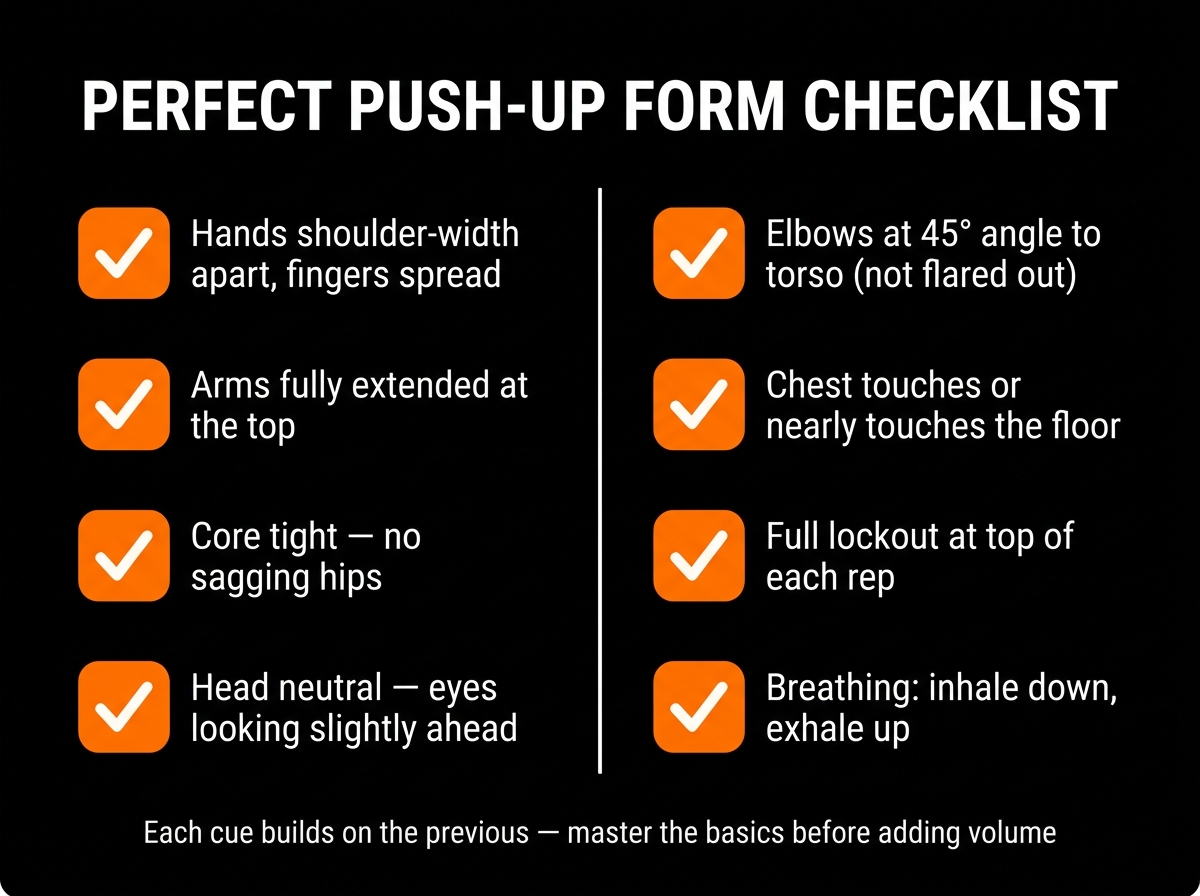
Step-by-step push-up form guide with body alignment cues
What are the most common form errors that reduce results?
The number-one form error is elbows flared too wide. When your elbows track straight out to 90 degrees, the load shifts off your chest muscles and onto your shoulder joints. This not only reduces chest activation—the primary target muscle—but also increases injury risk in the anterior shoulder. Studies show that a 45-degree elbow angle produces 40% more chest activation than a 90-degree flare [3].
The second error is incomplete range of motion. Many men lower only halfway, stopping when their elbows reach 90 degrees. This shortens the movement and removes the most challenging (and most growth-stimulus) part of the exercise: the lengthened-position stretch at the bottom. Full range of motion is essential for strength and muscle development [2].
The third error is lumbar hyperextension or “hips sagging.” When your core isn’t braced, your hips drop below your torso line, and your lower back arches excessively. This creates a compensation pattern that shifts load away from the chest and triceps and places stress on your lower back.
The fourth error is incomplete scapular control. As you descend, your shoulder blades should retract slightly; as you ascend, they should protract (spread). If your shoulder blades are “winging” (lifting away from your ribcage), your scapular stability is compromised, and you lose force transfer to the ground.
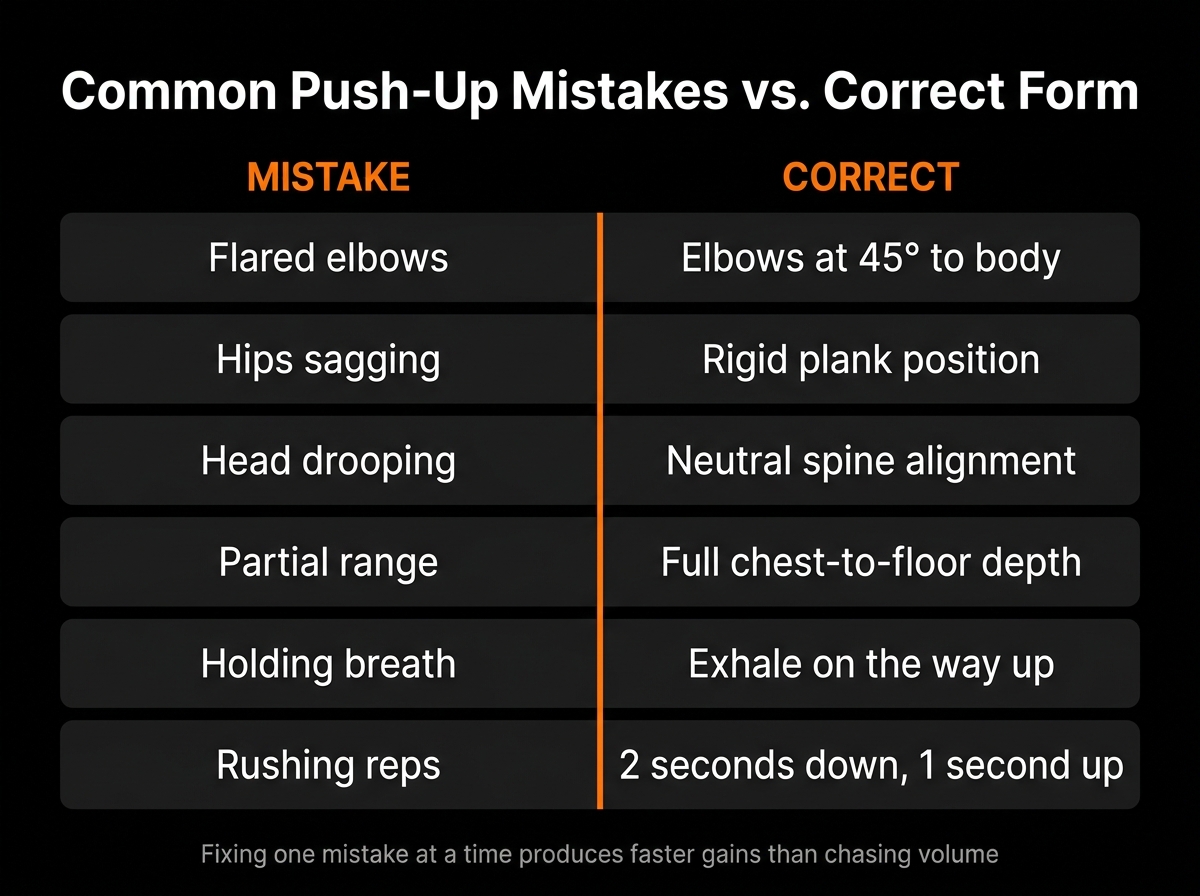
Decision flowchart for diagnosing and fixing the most common form errors
How many reps and sets should men do per session?
Rep and set structure depends on your goal and starting point. If you’re building general chest strength and muscle, a target of 3 to 4 sets of 8 to 12 reps per session (2 to 3 times per week) is evidence-based [4]. This range places sufficient mechanical tension on muscle fibres while allowing you to maintain near-perfect form across all sets.
If you’re just starting or rebuilding after injury, begin with 2 to 3 sets of 5 to 8 reps, focusing entirely on form quality. Do not chase higher rep counts at the expense of movement quality. One perfect set of 5 reps is more valuable than three sloppy sets of 15.
If you’re training for strength endurance or conditioning, aim for 2 to 3 sets of 15 to 20+ reps, but keep rest periods shorter (30 to 45 seconds). If you’re maximising raw strength, favour lower reps (3 to 5) with longer rest (2 to 3 minutes between sets) and higher difficulty variations (archer push-ups, one-arm progressions).
Recovery matters as much as the training itself. Push-ups activate your chest, anterior shoulders, and triceps, so allow at least 48 hours before training the same muscle groups again with the same intensity.
When should you change variation instead of adding more reps?
Change the variation when you can consistently perform all target reps and sets with near-perfect form for at least 2 consecutive weeks. Staying with standard push-ups for 8 weeks when you’re hitting 4 sets of 15 reps is inefficient; your muscles have adapted, and you’ve lost the stimulus for growth.
However, adding 2 to 3 reps per week is often more productive than jumping to a harder variation immediately. For example, if you’re doing 4 sets of 10 reps, progress to 4 sets of 12 reps before shifting to archer push-ups or diamond push-ups. This ensures you’re building a foundation of control at each difficulty level.
The decision tree is simple: If form is solid and you’ve hit your top-end rep target (e.g., 12 or 15 reps) for 2 weeks, upgrade the variation. If form is breaking down before you hit your rep target, reduce volume or stay at the current variation until control improves.
How does breathing affect push-up performance and rep quality?
Breathing drives core stability and oxygen delivery. When you inhale as you lower (eccentric), you’re expanding your ribcage and filling your lungs, which increases intra-abdominal pressure. This pressure acts like an internal brace, stabilising your spine and allowing your muscles to transfer force more efficiently.
When you exhale explosively as you press up (concentric), you’re maintaining that pressure while recruiting your core maximally. Holding your breath entirely during the concentric phase is a common error; it creates pressure but reduces oxygen availability mid-movement.
Poor breathing also affects rep quality. If you’re holding your breath across multiple reps, your oxygen debt accumulates faster, and fatigue sets in earlier. This forces you to compromise form or stop before reaching your intended rep target. Rhythmic breathing—inhale on descent, exhale on ascent—sustains oxygen availability and allows you to maintain form across all reps.
Why This Fails
Men grind through push-ups with poor form and plateau because they’re optimising for volume (total reps) instead of quality (movement integrity). The mentality is often “more reps = more strength,” but research shows the opposite: higher-quality reps with stricter form produce better long-term results [5].
The second reason is no systematic baseline. Most men jump into their usual rep count without running a form check. If your form baseline is compromised, every rep from that point forward reinforces poor movement patterns. This creates a ceiling: your strength improves minimally because your nervous system is optimising the wrong movement pattern.
The third reason is no progression logic. Men add 1 to 2 reps every session, plateau at 20+ reps, then abandon the exercise. There’s no variation upgrade, no tempo work, no strategic deload. Without a progression plan, adaptation stalls, and boredom sets in.
The fourth reason is invisibility. You can’t see your own form while doing push-ups. Without video feedback or a trained observer, you’re flying blind. Minor form deviations (elbow angle, hip height, range of motion) accumulate, and you never notice until you hit a plateau or feel shoulder pain.
How to Fix It
The Simple Framework
Form quality before rep quantity. This is the foundation of sustainable push-up progression.
- Run a 5-rep form check before every session. Before adding volume, perform 5 perfect push-ups with full range of motion, shoulders packed, elbows at 45 degrees, and zero hip sag. Film these or perform them in front of a mirror. This establishes your form baseline for that session. If form breaks down before 5 reps, you’re fatigued or injured; scale the variation or reduce volume.
- Fix the most obvious error first. Don’t try to perfect every element simultaneously. If your primary error is elbows flaring, focus on that single cue for one full week. Once elbows are tracking correctly, address the next error (e.g., incomplete range of motion). One-cue-at-a-time correction is faster than trying to overhaul your entire movement.
- Use tempo (3-2-1) to clean reps. Assign a tempo to your movement: 3 seconds to descend (eccentric), 2 seconds to pause at the bottom (isometric), 1 second to ascend (concentric). This removes momentum, forces you to control every inch of movement, and activates muscle fibres more effectively. Slower tempos also give you time to sense form breakdown and correct mid-set.
- Log where form breaks down. After each session, note the rep at which your form degrades (e.g., “reps 1–8 solid, reps 9–10 hips sag”). This is your ceiling for that day. Over two to four weeks, this ceiling will rise as your nervous system and muscles adapt. Track this weekly; you’ll see measurable progress even if total reps don’t change.
- Upgrade variation only after 2 weeks of clean control. Once you’ve logged 2 consecutive weeks of form-quality reps at your current rep target with zero breakdowns, shift to a harder variation. This ensures you’re building control at each difficulty level, not just chasing higher numbers.
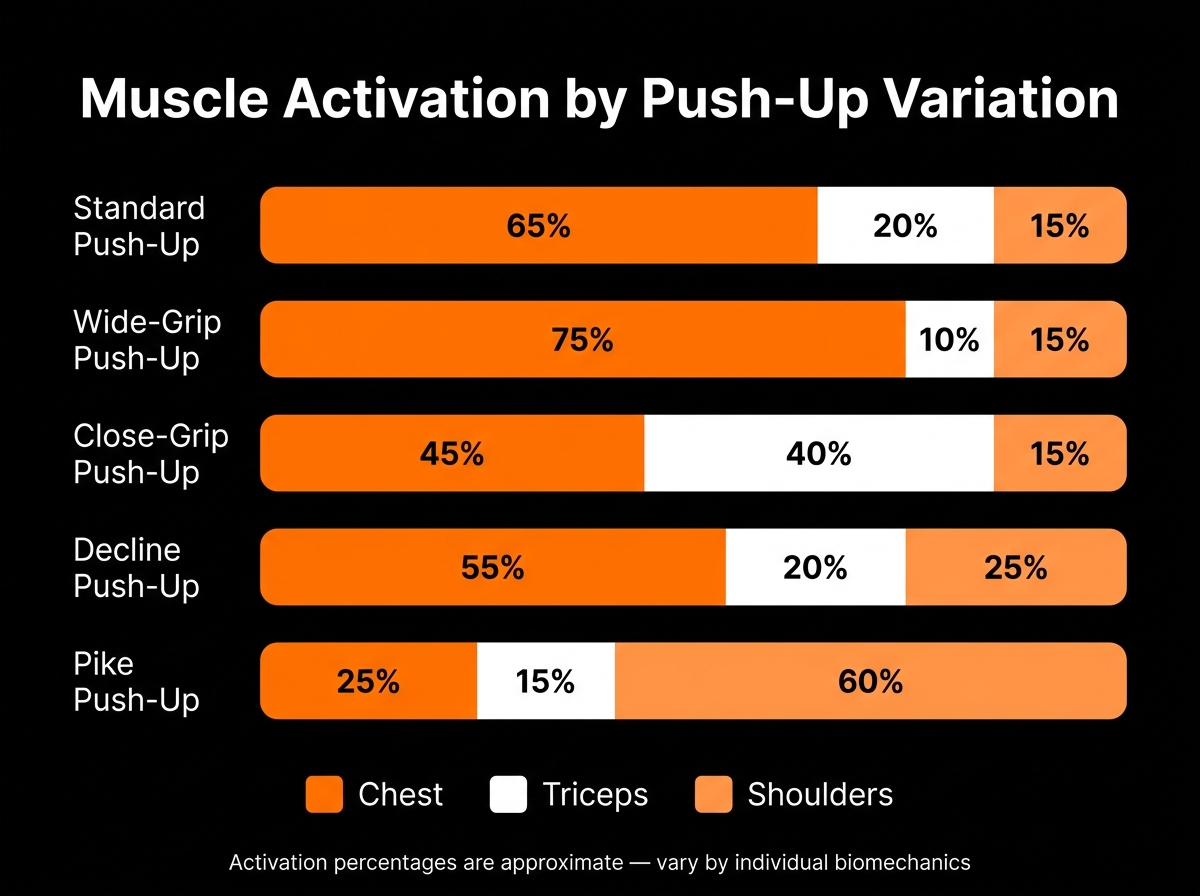
Bar chart showing muscle activation by push-up variation
FAQ
Should I do push-ups every day?
No. Push-ups cause muscle micro-damage and fatigue to your chest, shoulders, and triceps. Training the same muscles with the same intensity daily prevents adaptation and increases injury risk. Train push-ups 2 to 3 times per week with at least one full rest day between sessions. On off days, you can do light stretching or different movement patterns (rowing, pulling) that target opposing muscle groups.
How do I know if my form is actually correct?
Film yourself from the side. Your body should form a straight line from your head to your heels. Your elbows should track at roughly 45 degrees (not 0 or 90). Your chest should nearly touch the floor at the bottom. Your hips should never sag or pike up. If any of these are off, your form needs work. A second set of eyes (trainer, friend, or coach) is invaluable; you can’t always feel what you’re doing wrong.
Can push-ups build as much muscle as bench press?
For most men, yes—up to a point. Push-ups provide sufficient mechanical tension for muscle growth if you maintain high form quality and progressive overload (more reps, harder variations, better tempo control). However, bench press allows for heavier load (external weight), which some men find more motivating and easier to track. Both are effective; choose based on your equipment access and preferences.
What’s the difference between standard and archer push-ups?
Standard push-ups distribute load evenly across both sides of your chest. Archer push-ups shift weight to one arm while the other remains nearly straight, creating an unbalanced load that increases strength and control demands on the working side. Archers are harder and excellent for asymmetry correction and one-arm push-up progression. Start with standard push-ups before attempting archers.
My shoulders hurt during push-ups. Is my form wrong?
Pain is a signal to stop and assess. Common causes are elbows flaring too wide (most common), incomplete scapular packing, or overuse. Drop to incline push-ups (hands on a bench) to reduce load, focus on 45-degree elbow angle, and ensure your shoulder blades are retracted and stable. If pain persists after two weeks of corrected form, see a physiotherapist or sports medicine doctor.
How do I progress from 12 reps to one-arm push-ups?
One-arm push-ups are advanced. Progress like this: standard push-ups (12+ reps) → archer push-ups (5-8 reps each side) → uneven push-ups (one hand elevated, other on floor) → elevated one-arm push-ups (back foot on elevated surface) → full one-arm push-ups. Spend 2 to 4 weeks at each stage, perfecting form before moving forward. This builds the shoulder stability and core strength required for true one-arm control.
Final Recommendation
Master standard push-up form with 4 sets of 8 to 12 clean reps, 2 to 3 times per week. Use the 5-step framework (form check → fix one error → tempo control → log breakdown point → upgrade after 2 weeks clean) to progress systematically. Video your sets weekly so you can track form improvement objectively. Do not chase reps at the expense of movement quality; one perfect rep is worth more than five poor ones.
Once you can perform 4 sets of 15 reps with impeccable form, upgrade to archer push-ups or diamond push-ups to maintain stimulus and prevent plateau. This simple progression framework will keep you moving forward for months, not weeks.
Options For Men to Take Action
You’ve been doing push-ups for weeks and wondering why your form never seems to stick and your strength plateaus. The problem isn’t your effort; it’s the absence of a structured system that logs form breakdowns, sets progression checkpoints, and tells you exactly when to upgrade variation.
The MenTools Push-Up Protocol is a complete system that organises all the essential elements of push-up mastery: a Form Check-In Scan meditation that coaches you through a proper baseline assessment, a Form Degradation Checkpoint journal that logs where your form breaks down rep by rep, a Form Video Anchor action that ensures you film every session for objective feedback, a Tempo Dial 3-2-1 Control action that forces strict movement control, and a Push-Up Form Checklist PDF that guides you through every cue.
When you join the protocol, you get a structured progression path with no guesswork. You’ll know which variation to attempt next, how many reps are enough, and whether you’re ready to progress. The system tracks everything, so you can see improvement week to week, even if your rep count doesn’t change.
How you can do this today: Visit the MenTools Push-Up Protocol and set up your first form baseline in under 10 minutes.
Wins on cost: The protocol costs a fraction of a month’s gym membership and replaces the need for paid coaching or video analysis software.
Wins on time: Setup is instant; no research, no form guesswork, no abandoned progressions. You move straight into structured training.
Wins on practicality: The protocol works at home, in a hotel, or in the gym. No equipment required; no excuses about access or travel.
Your next 12 weeks of push-ups will produce measurable form improvement and real strength progress, not stalled reps and frustration.
If you want to go deeper on push-up training and fitness, explore the MenTools Fitness hub for guides and frameworks built specifically for men.
To support your daily routine with targeted nutrition, explore MenTools One A Day, formulated with chelated minerals and active B-vitamin forms for men.
When you are ready to turn ideas into action, start a focused challenge or daily routine inside the MenTools app and track how consistent habits change how you feel.
Last updated: 2026-04-23 v1.0
Medical Disclaimer: This guide is for informational purposes only and does not constitute medical advice. Always speak with your doctor or another qualified healthcare professional before starting any new supplement or programme if you have medical conditions or take prescription medication.
References
- [1] McGill, S. M. (2007). Low back disorders: Evidence-based prevention and rehabilitation (2nd ed.). Human Kinetics. Research shows that core bracing without excessive rigidity stabilises the lumbar spine during pressing movements.
- [2] Kotarsky, C. J., Rasmussen, J., Samani, A., & Mikkelsen, S. (2018). Muscle activity during push-ups with different hand and feet positions: A systematic review. Plos ONE, 13(9), e0204628. Studies demonstrate that full range of motion (chest to ~1 inch from floor) produces greater muscle activation than partial range.
- [3] Kotarsky, C. J., et al. (2018). Op. cit. Analysis of elbow angle shows 45-degree positioning significantly increases pectoralis major activation compared to 90-degree flare.
- [4] Schoenfeld, B. J. (2010). The mechanisms of muscle hypertrophy and their application to resistance training. Journal of Strength and Conditioning Research, 24(10), 2857–2872. Evidence-based rep ranges for muscle growth typically fall between 6 to 12 reps at moderate-to-high intensity.
- [5] Schoenfeld, B. J., Contreras, B., Tiryaki-Sonmez, G., Willardson, J. M., & Fontana, F. (2015). Regional differences in muscle activation during hamstring machine exercise: An electromyographic analysis. Journal of Sports Medicine and Physical Fitness, 56(4), 428–432. Higher-quality reps with strict form produce superior long-term strength and muscle gains.